
 Tweet
Tweet
Well, since posting in the off grid section for my shed, I've learned some very useful information so I thought I would post my first plans for my Solar Air Screen Collector that I plan to set outside the window of my shed to see if I can pipe some hot air into this place.
First thing is first, the shed is not insulated. It's double sheeted on the exterior of the walls, and there is a single sheet of 1/2"OSB on the inside to finish it off. There is an 8' ridge vent, and 2x 3x12 vents to allow airflow from near the soffit area. I'm not insulating it. This is just going to be a fun DIY project and something that I can use when I'm working out there.
I plan to build it out of 2x6 (hopefully metal studs if the local HD has them). It will be 4'x4' and it's a little different from most of the others I've seen out there. Here are the plans I've drawn up rather quickly on the computer.
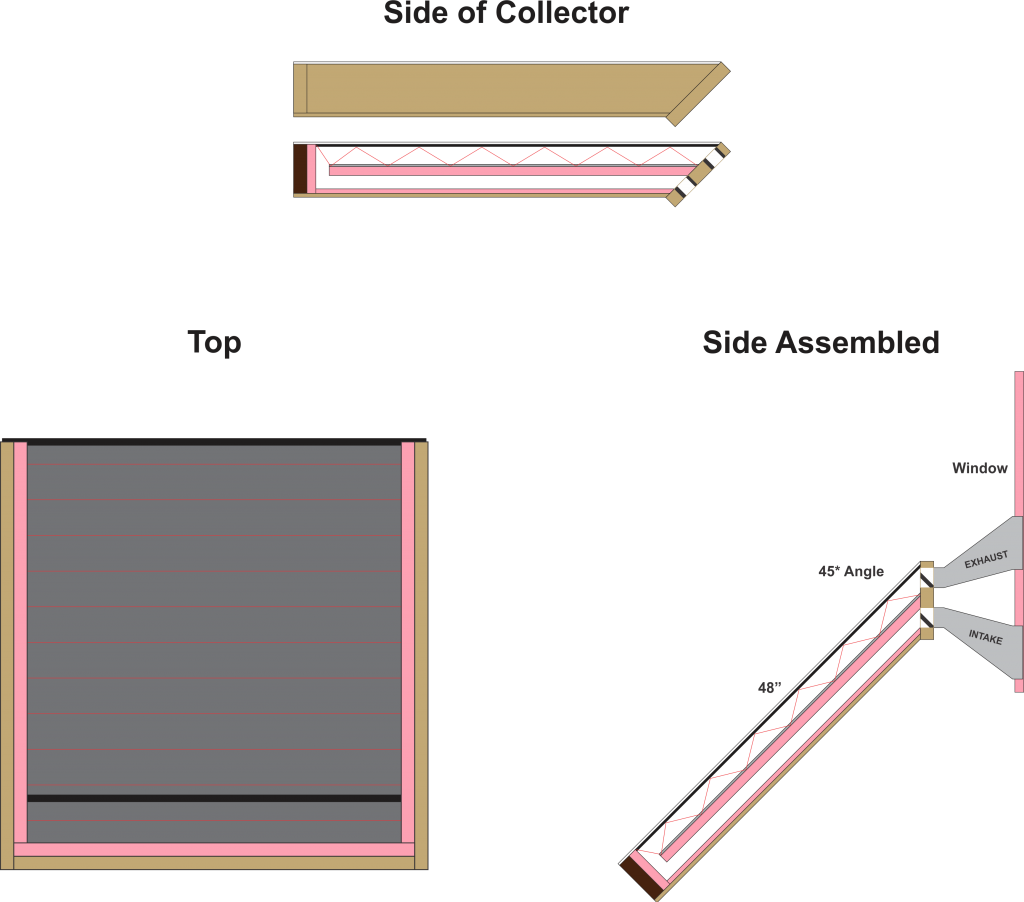
Cool air will be drawn into the lower duct and fall down the backside of the collector. That side will be insulated with 1/2" foam board and sealed off with a 1/2" piece of OSB. This will be a free flowing area, though I have thought about making channels to disperse the air evenly, I have not shown this in the drawing.
The lower portion of the collector will be open where the air begins to pass through the screen. I've designed it so the screen zig zags back and forth up the heating side of the collector. This is to cause turbulence and allow for some scrubbing effect on the air. It should also slow it down and allow it to be heated evenly as it passes through the hot screen 13 different times.
This next part is even more different than everyone else's designs. Please give me your comments and concerns with the design.
For mine, I will not have the clear acrylic cover exposing everything inside to the sun like everyone else. Instead, I will be placing black solar pool heating blanket material (which is basically heavy duty bubble wrap) on the inside of my clear plastic glazing. This will soak in the heat from the sun and heat the space behind it just as it works on the pool water, only this time with air. The cooling and heating sides of the collector will be separated by a 1" piece of foam insulation. The heating side will also be lined with single sided foil reflective bubble insulation to help reflect what heat is coming from the solar pool blanket back into the space, effectively reflecting heat onto the air passing through and heating it more so.
The duct work at the top of the collector is built this way because the window in my shed is a vertical slider. The ducts will be 12" wide x 2 1/4" tall and they reduce into a 6" vent. I plan to take a 1/2" piece of OSB, cut it to about 8" wide and however tall my window is, and then attach some foam insulation to the other side. I'll probably paint the outside of it black so it doesn't stand out too much. I will likely leave this as a passive heater until I can find a deal on some 6" solar fans that I can attach to the duct work. I could also run the fans off my solar electricity since they would only be running during the day, I wouldn't be discharging much. I'll have to
Here are the plans I've come up with thus far. I'll probably start on it in the next couple of weeks. As soon as I get my garage cleaned out and the shed organized enough to get side tracked again....
Let me know what you all think of the design. I'm not going to be getting super technical with testing it. I'll use an IR laser thermometer that we use here at work to measure curing temps for printing garments. I'll also put a thermometer up inside the shed to read the change in temp, etc.
I'll explain the colors:
Pink: Ridgid Foam Insulation - varies thicknesses
Black: Solar Heating Pool Blanket Masterial
Grey: Foil Reflective Bubble Wrap Insulation
White: Clear Plexiglas Glazing
Brown: Wood Materials
First thing is first, the shed is not insulated. It's double sheeted on the exterior of the walls, and there is a single sheet of 1/2"OSB on the inside to finish it off. There is an 8' ridge vent, and 2x 3x12 vents to allow airflow from near the soffit area. I'm not insulating it. This is just going to be a fun DIY project and something that I can use when I'm working out there.
I plan to build it out of 2x6 (hopefully metal studs if the local HD has them). It will be 4'x4' and it's a little different from most of the others I've seen out there. Here are the plans I've drawn up rather quickly on the computer.
Cool air will be drawn into the lower duct and fall down the backside of the collector. That side will be insulated with 1/2" foam board and sealed off with a 1/2" piece of OSB. This will be a free flowing area, though I have thought about making channels to disperse the air evenly, I have not shown this in the drawing.
The lower portion of the collector will be open where the air begins to pass through the screen. I've designed it so the screen zig zags back and forth up the heating side of the collector. This is to cause turbulence and allow for some scrubbing effect on the air. It should also slow it down and allow it to be heated evenly as it passes through the hot screen 13 different times.
This next part is even more different than everyone else's designs. Please give me your comments and concerns with the design.
For mine, I will not have the clear acrylic cover exposing everything inside to the sun like everyone else. Instead, I will be placing black solar pool heating blanket material (which is basically heavy duty bubble wrap) on the inside of my clear plastic glazing. This will soak in the heat from the sun and heat the space behind it just as it works on the pool water, only this time with air. The cooling and heating sides of the collector will be separated by a 1" piece of foam insulation. The heating side will also be lined with single sided foil reflective bubble insulation to help reflect what heat is coming from the solar pool blanket back into the space, effectively reflecting heat onto the air passing through and heating it more so.
The duct work at the top of the collector is built this way because the window in my shed is a vertical slider. The ducts will be 12" wide x 2 1/4" tall and they reduce into a 6" vent. I plan to take a 1/2" piece of OSB, cut it to about 8" wide and however tall my window is, and then attach some foam insulation to the other side. I'll probably paint the outside of it black so it doesn't stand out too much. I will likely leave this as a passive heater until I can find a deal on some 6" solar fans that I can attach to the duct work. I could also run the fans off my solar electricity since they would only be running during the day, I wouldn't be discharging much. I'll have to
Here are the plans I've come up with thus far. I'll probably start on it in the next couple of weeks. As soon as I get my garage cleaned out and the shed organized enough to get side tracked again....
Let me know what you all think of the design. I'm not going to be getting super technical with testing it. I'll use an IR laser thermometer that we use here at work to measure curing temps for printing garments. I'll also put a thermometer up inside the shed to read the change in temp, etc.
I'll explain the colors:
Pink: Ridgid Foam Insulation - varies thicknesses
Black: Solar Heating Pool Blanket Masterial
Grey: Foil Reflective Bubble Wrap Insulation
White: Clear Plexiglas Glazing
Brown: Wood Materials


Comment